Labs
Lab Manual
If you want to download the lab manual, please send e-mail to xwang8@sjtu.edu.cn or 13-liujiaqi@sjtu.edu.cn for the password.
Lab 1-5: Click Here to Download
Lab 6-11: Click Here to Download
Lab 14-15: Click Here to Download
Lab14: 基于RFID的物品归类
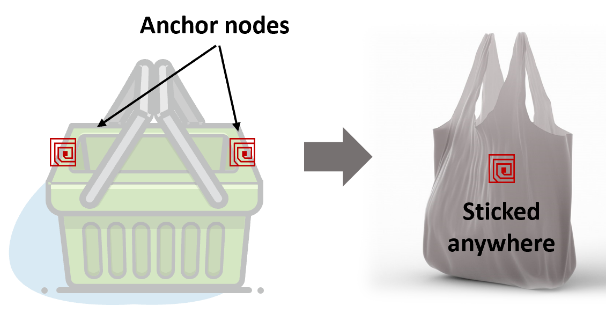
Introduction: 传统的RFID定位技术依赖于对信号的强度(RSSI值)和相位的准确测量,然而标签本身的朝向、弯曲程度,以及附着的物体材料等多个因素,都会极大程度的影响反射信号的RSSI值和相位信息,从而导致传统RFID技术定位的精度不高。同时,由于当标签数量较多且分布较为密集时,标签与标签之间会存在耦合效应,导致部分标签反射信号强度减小,这也会导致RFID定位精度的下降。近期有一些论文研究了标签与标签之间的互干扰现象,即利用标签与标签之间互干扰现象的强弱,判断出标签与标签之间的相对距离,从而借助对环境因素较为鲁棒的互干扰信号和提前在购物车上布置好的“锚点”完成对物品的归类。
Credit to Dr. Meng Jin .
Lab15: 基于声音通信的信息嵌入
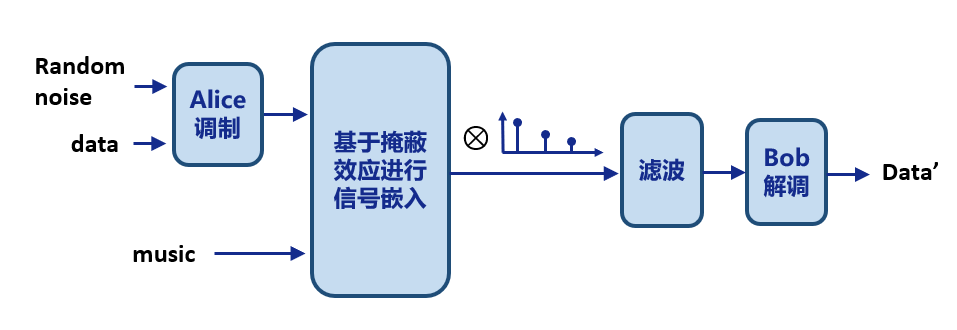
Introduction: 本实验介绍了一种基于声音通信的信息嵌入方法。该方法利用神经网络和掩蔽效应将所需传输的信息嵌入音频中,在最小化信息嵌入对音质影响的情况下,实现对嵌入信号的调制解调。本实验介绍了该方法的实现过程。我们将了解基于声音通信的信息嵌入的设计原理及整体架构,基于Tensorflow仿真实验,探究该方法的性能。
Credit to Dr. Meng Jin .
Tensorflow Lab1: Mining Advisor-advisee Relationships via Machine Learning Methods
Introduction: This Lab focus on learning basic machine learning methods and implementing them on a specific topic, to find advisor- advisee relationships in academic heterogeneous networks. In this Lab, you will learn some machine learning tools and realize your own model based on Python and Sklearn. Moreover, you will use Keras and Tensorflow to build a deep-learning model and compare the performance between deep learning and traditional machine learning methods.
If you want to download the lab manual, please send e-mail to xwang8@sjtu.edu.cn or 13-liujiaqi@sjtu.edu.cn for this lab.
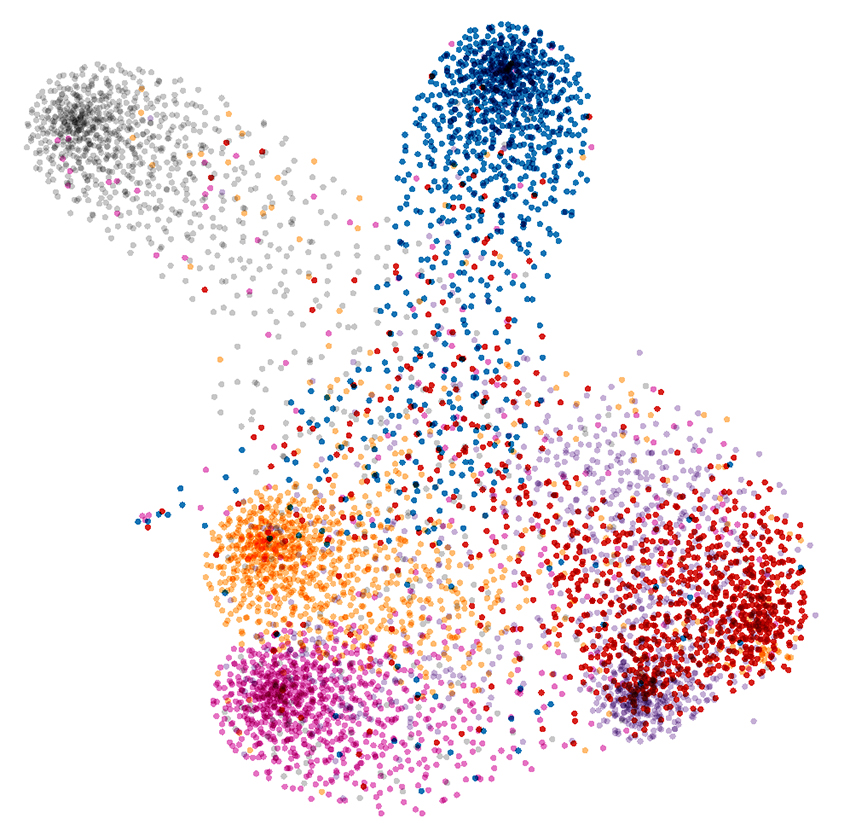
Tensorflow Lab2: Papers Classification and Visualization
Introduction: This lab focus on introducing the basic nlp methods and implementing them on a specific topic, to classify and visualize papers. In this lab, you will learn some basic concepts and steps in natural language processing and realize them using Python. Moreover, you will use Tensorflow to build your model and Tensorboard to visualize the results.
If you want to download the lab manual, please send e-mail to xwang8@sjtu.edu.cn or 13-liujiaqi@sjtu.edu.cn for this lab.
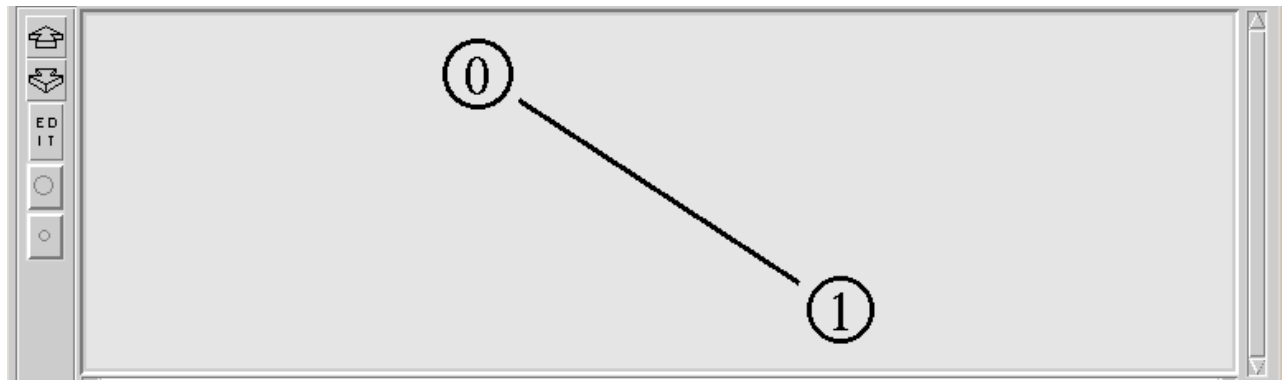
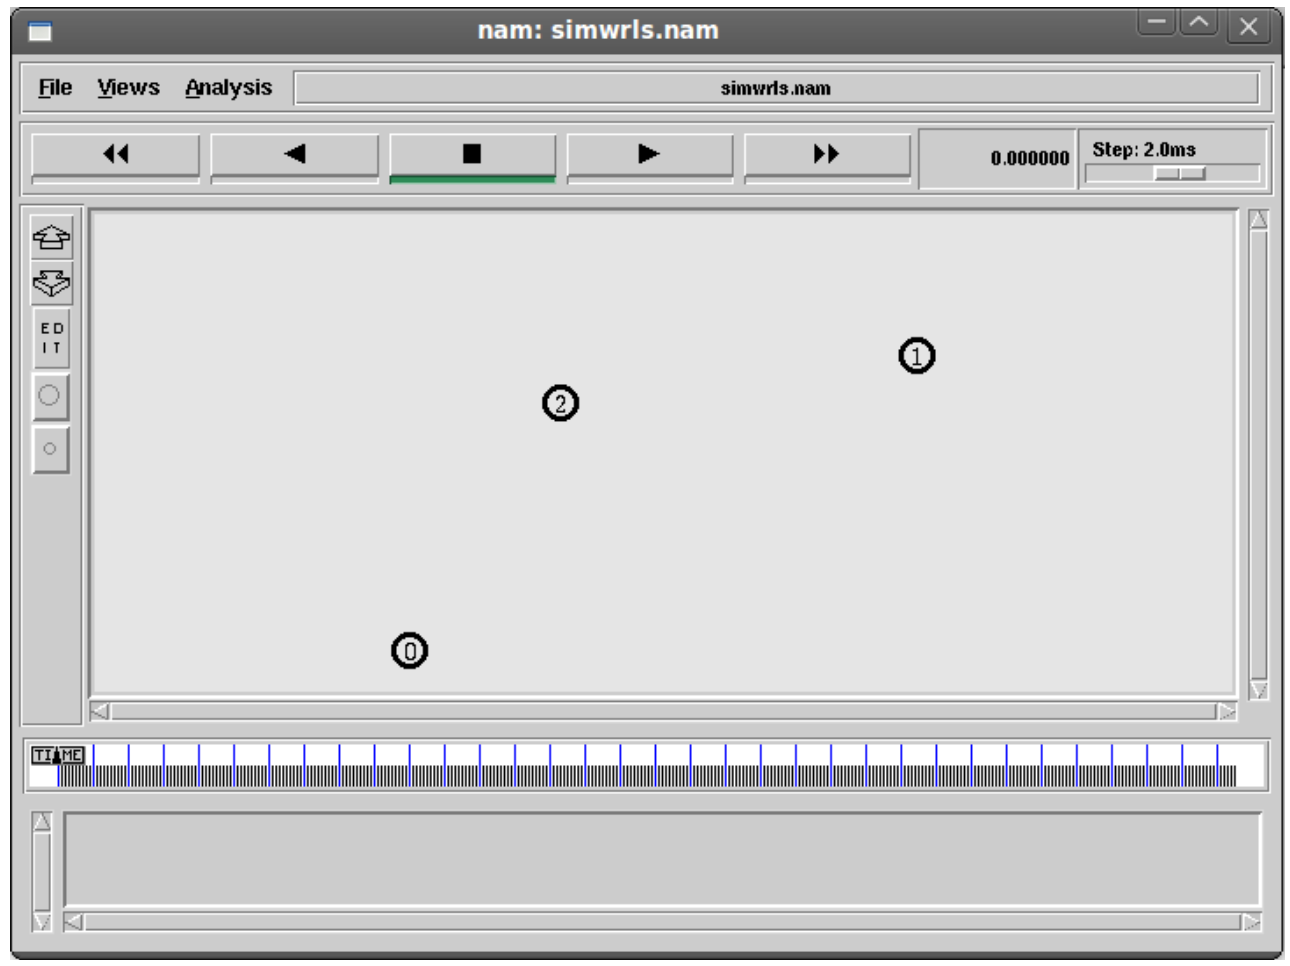
Lab1: NS2 Warm Up
Introduction: In this section, we are going to develop a Tcl script for ns which simulates a simple topology. we are going to learn how to set up nodes and links, how to send data from one node to another, how to monitor a queue and how to start nam from simulation script to visualize simulation.
Lab2: TCP over Ad Hoc Networks
Introduction: The experiment will make you get familiar with NS2 wireless simulation process. Through some
simple scenarios, you will get intuition of different routing protocols,e.g. DSDV, AODV, DSR. These
knowledge will be the fundamentals of your further research. You are expected to follow the instructions
in the first part and do some of new test based on this.
Lab3: Ad Hoc Routing
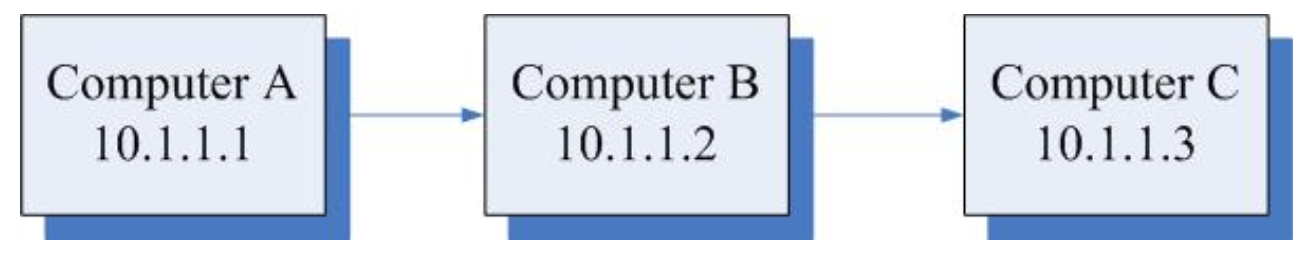
Description of Ad Hoc routing Testbed: In this experiment you will use 3 laptops to configured to communicate in ad hoc mode. The laptops directly communicate with each other in peer-to-peer mode, without going through 802.11g access points. The topology of the ad hoc routing testbed is shown as the figure. In the above setup, you will use MAC address blocking feature of the iptables utility such that computer A cannot communicate directly with computer C and computer C cannot communicate directly with computer A. This is done to simulate a real-world ad hoc network scenario where computer A is out of the transmission range of computer C, but computer B can reach both computer A and computer C (thus it can act as intermediate hop to forward packets from computer A to computer C) within the confines of the lab. Though we can decrease the transmission power of WLAN card to really simulate a multi-hop scenario, we will leave it to further research.
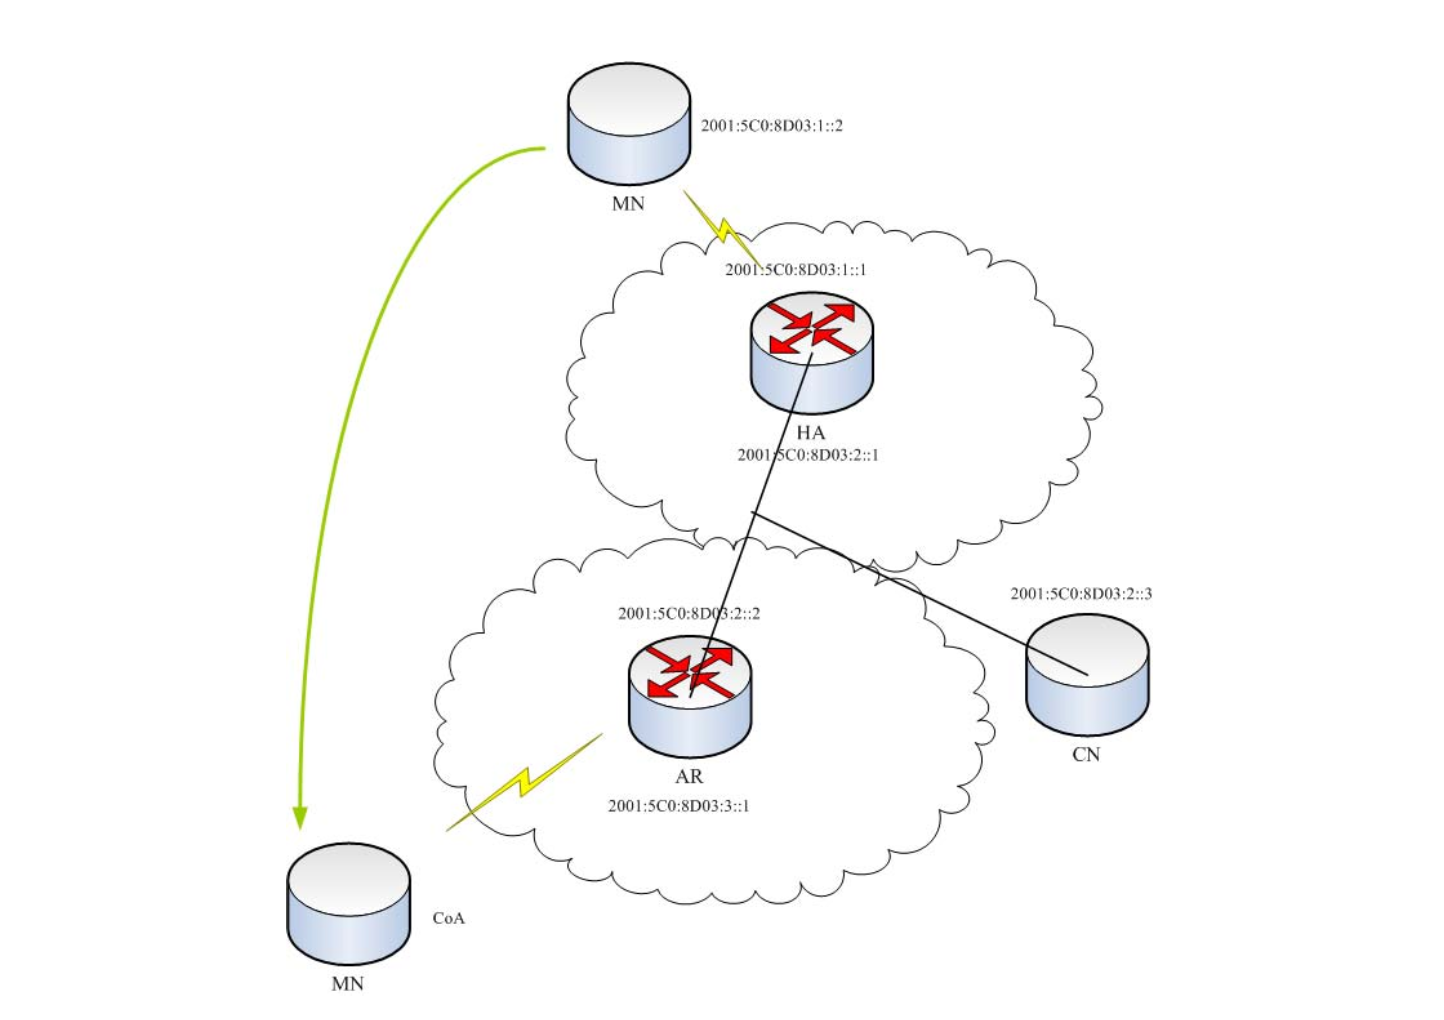
Lab4: Mobile IP
Introduction: This document describes the software and procedures to set up and use mobile IPv6 for Linux.
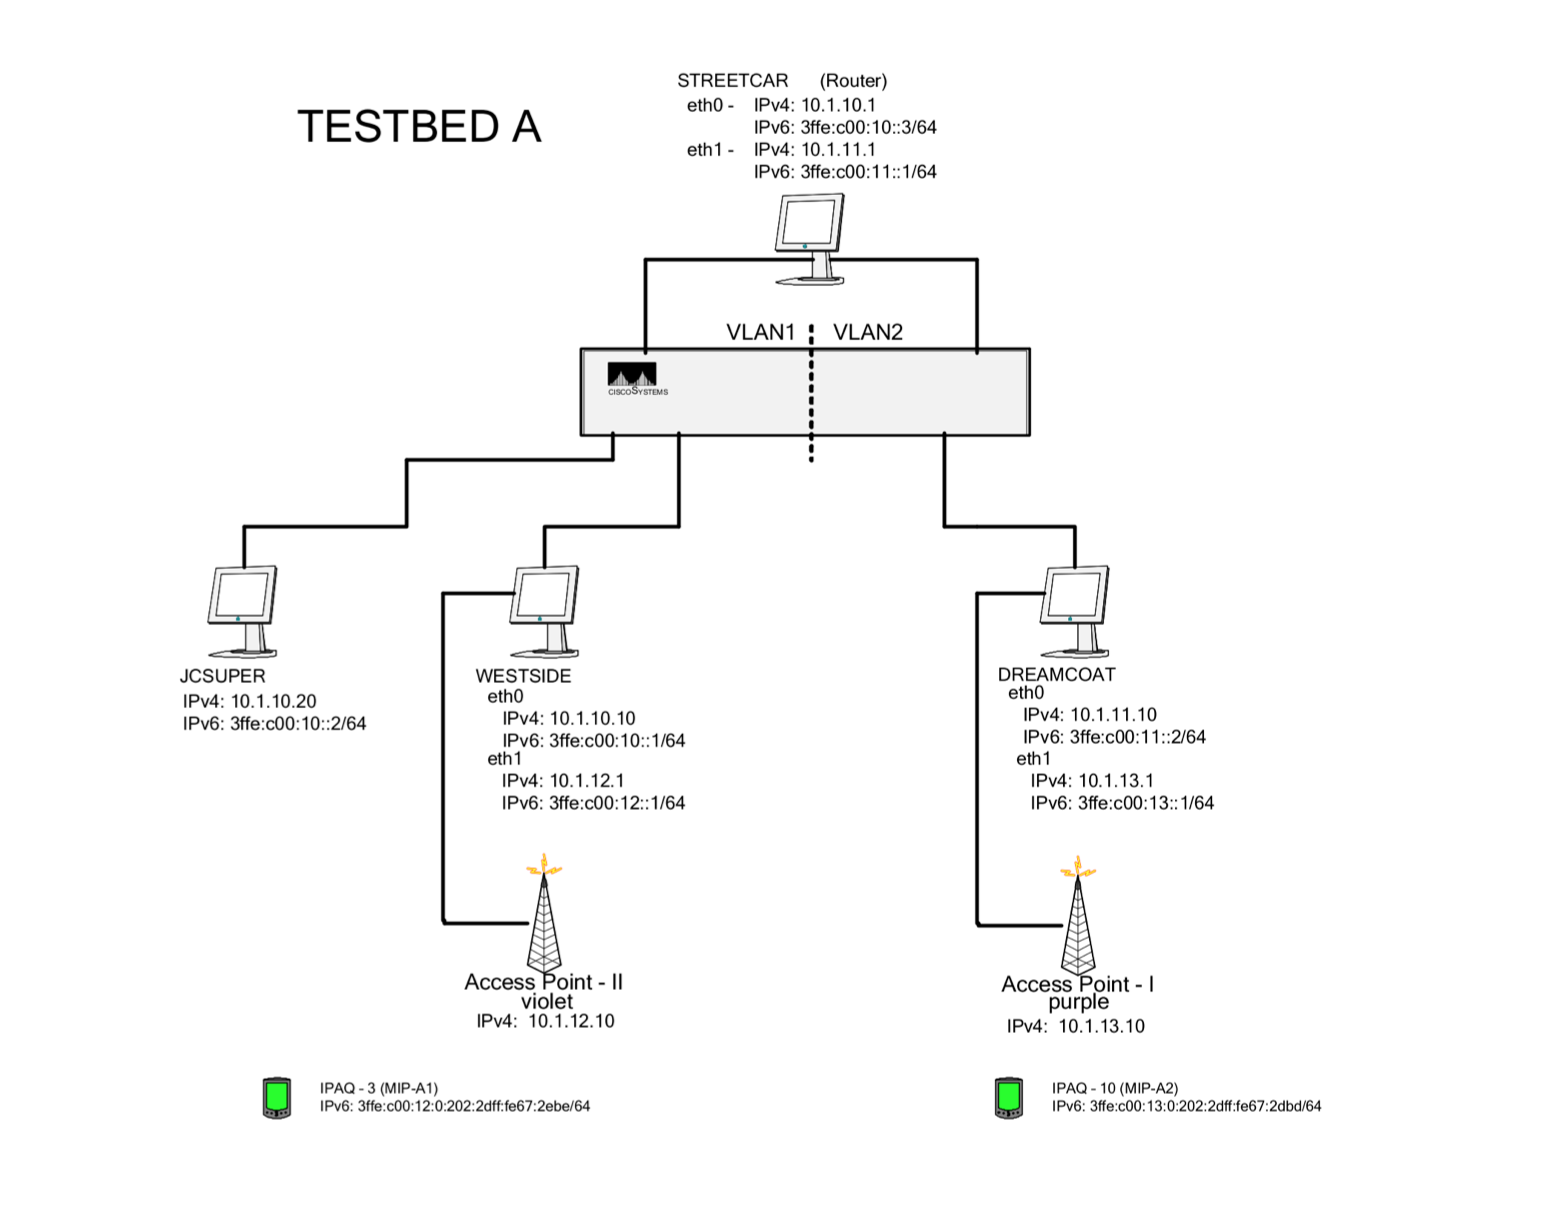
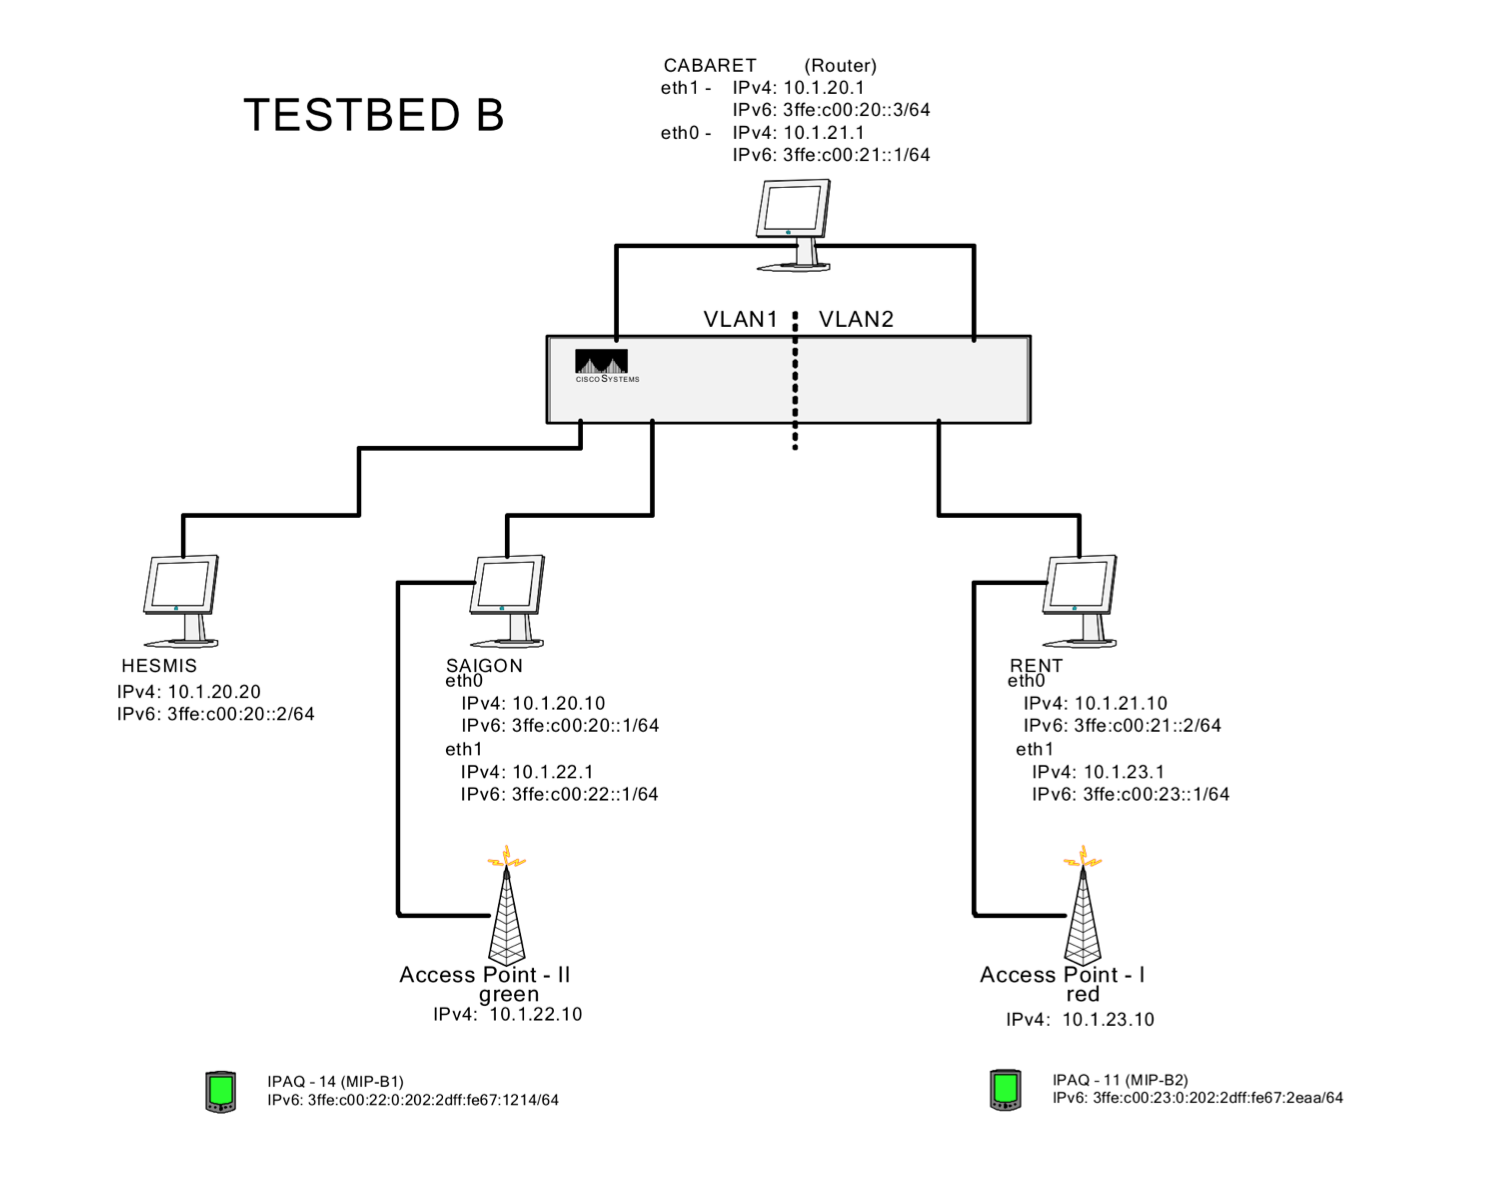
Lab5: Wireless Security
Introduction: Shown in the two figures, one wireless testbed is divided into two sections, wired and wireless. The wired network consists of two hubs, four computers and two access points. The PC router is named STREETCAR in testbed A or CABARET in testbed B. On either side of the router, there is one VLAN, totally 2 VLANs. The computer router acts as a connector as well as a gateway for the computers on either side of each VLAN. In each VLAN, one of the computers is playing the role of gateway or router to forward the packets between wired and wireless networks. WESTSIDE and DREAMCOAT in testbed A, SAIGON and RENT in testbed B are all connected to a wireless access point, which then acts as a connector to the wireless devices, iPAQs. The infrastructures of testbed A and B are illustrated in the two figures. Wired Equivalent Privacy(WEP) is an IEEE standard security protocol for wireless 802.11 networks. Introduced in 1997, WEP was found to be very inadequate and was superseded by WPA, WPA2 and 802.11i. Its authentication method was extremely weak and even helped an attacker decipher the secret encryption key. As a result, WEP authentication was dropped from the Wi-Fi specification.
Lab6: Teaching Assistant
procedure:
1. install jdk
2. configure jdk
3. install Android SDK
4. install eclipse+ADT
Lab7: SDN 实验
实验目的: 熟悉 SDN 的基本操作;修改并增加程序的功能。
Lab8: Measurement of WiFi Signal Strength
The Purpose: Get used to the WiFi system and accomplish the sampling and measuring of WiFi signal strength through programming in Android on smartphone.
Lab9: Android Pedometer
Purpose
(1) By programming an Android pedometer program using mobile platform,we learn
to familiarize the calling methods of mobile platform sensors.
(2) Simple mobile apps’ design and implementation.
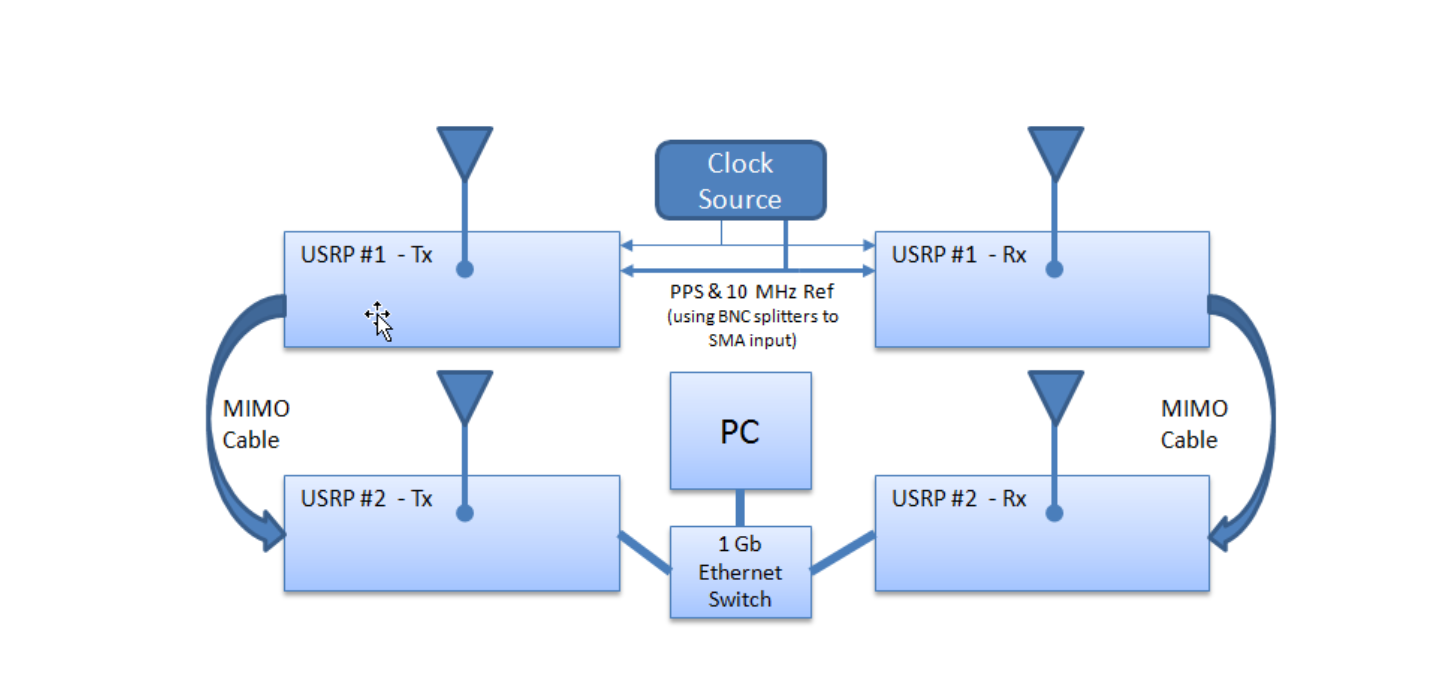
Lab10: 2 × 2 MIMO System
Introduction With MIMO, you can increase wireless system performance without increasing power consumption. When you use
multiple antennas, the transmitted signal progresses through different wireless channels (from the
transmitter antennas to the receiver antennas) and creates a capacity gain by exploiting channel diversity.
Refer tohttp://en.wikipedia.org/wiki/MIMO for more information about MIMO.
Lab11-option1: ARTcode experiment
Introduction: In this project, we will take you onto the journey of learning and understanding ARTcode. ARTcode was one
of our research projects. The goal of ARTcode is to create a code that serves as a barcode and can help
users identify the contents of the barcode at the same time. The detailed information of ARTcode can be
found at this address: http://dl.acm.org/citation.cfm?id=2971733. You can click on “PDF” and obtain an explanation of ARTcode.
The prerequisite of this project includes K-means clustering and MATLAB programming. If you are not
familiar with MATLAB, now is the time for you to grasp it.
Before we make any move, firstly we would like to give you a brief introduction on our ARTcode
implementation MATLAB programs.
In ARTcode experiment folder, there are a number of MATLAB files, some data files, and a folder. The folder
contains some testing images that you can work on. Of course you can put in your own images. Just don’t
forget to adjust the image size (128*128)!
The MATLAB files in ARTcode experiment folder generate an ARTcode. The main function is encodeMain.m.
Don’t panic, important information are provided in comments. Oh, another tip, you might want to read the
questions first before you try to understand the MATLAB functions.
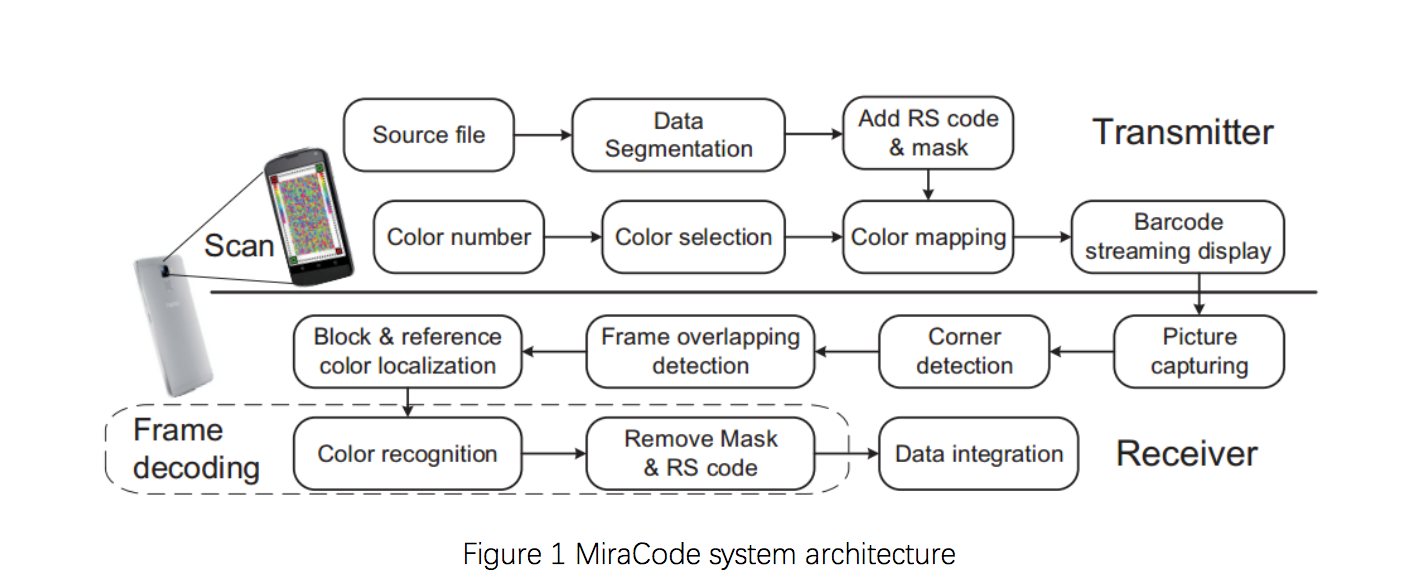
Lab11-option2: MiraCode Experiment
Introduction: MiraCode is a multi-colored barcode which is used for data transmission. Compare with existing barcodes, MiraCode uses 16 colors which makes its unit block capacity four times as the wide used QR code.